
Categories
Archives
- March 2022 (10)
- November 2021 (9)
- October 2021 (10)
- January 2021 (5)
- November 2020 (6)
- August 2020 (2)
- June 2020 (9)
- May 2020 (4)
- April 2020 (7)
- March 2020 (4)
- January 2020 (6)
- October 2019 (4)
- August 2019 (3)
- July 2019 (2)
- June 2019 (4)
- May 2019 (3)
- April 2019 (15)
- February 2019 (1)
- January 2019 (5)
- November 2018 (8)
- August 2018 (10)
- July 2018 (4)
- May 2018 (23)
- April 2018 (4)
- March 2018 (4)
- February 2018 (1)
- January 2018 (5)
- October 2017 (1)
- September 2017 (6)
- July 2017 (8)
- May 2017 (11)
- February 2017 (1)
- January 2017 (6)
- November 2016 (5)
- August 2016 (8)
- June 2016 (9)
- May 2016 (9)
- March 2016 (2)
- December 2015 (7)
- November 2015 (1)
- October 2015 (5)
- August 2015 (8)
- July 2015 (3)
- June 2015 (2)
- May 2015 (14)
- April 2015 (5)
- March 2015 (13)
- February 2015 (5)
- January 2015 (14)
- December 2014 (1)
- November 2014 (9)
- October 2014 (4)
- September 2014 (12)
- August 2014 (13)
- July 2014 (10)
- June 2014 (4)
- May 2014 (9)
- April 2014 (3)
- March 2014 (3)
- February 2014 (7)
- January 2014 (2)
- December 2013 (2)
- November 2013 (4)
- October 2013 (12)
- September 2013 (14)
- August 2013 (10)
- July 2013 (6)
- June 2013 (11)
- May 2013 (12)
- April 2013 (1)
- March 2013 (6)
- February 2013 (7)
- January 2013 (4)
- December 2012 (6)
- November 2012 (4)
- October 2012 (2)
- September 2012 (5)
- July 2012 (8)
- June 2012 (3)
- May 2012 (12)
- April 2012 (4)
- March 2012 (7)
- February 2012 (4)
- January 2012 (1)
- December 2011 (9)
- November 2011 (10)
- October 2011 (10)
- September 2011 (4)
- August 2011 (8)
- July 2011 (28)
- June 2011 (5)
- May 2011 (7)
- April 2011 (3)
- March 2011 (6)
- February 2011 (10)
- January 2011 (7)
- December 2010 (13)
- November 2010 (10)
- October 2010 (10)
- September 2010 (12)
- August 2010 (4)
- July 2010 (16)
- June 2010 (3)
- May 2010 (7)
- April 2010 (3)
- March 2010 (3)
- February 2010 (12)
- January 2010 (5)
- December 2009 (11)
- November 2009 (14)
- October 2009 (19)
- September 2009 (8)
- August 2009 (15)
- July 2009 (14)
- June 2009 (8)
- May 2009 (6)
- April 2009 (8)
- March 2009 (8)
- February 2009 (11)
- January 2009 (12)
- December 2008 (13)
- November 2008 (23)
- October 2008 (10)
- September 2008 (11)
- August 2008 (13)
- July 2008 (10)
- June 2008 (9)
- May 2008 (6)
- April 2008 (4)
- March 2008 (2)
- January 2008 (3)
- December 2007 (9)
- November 2007 (3)
- October 2007 (3)
- September 2007 (1)
- July 2007 (8)
- June 2007 (11)
- May 2007 (13)
- April 2007 (10)
- March 2007 (15)
- February 2007 (1)
- January 2007 (15)
- December 2006 (8)
- November 2006 (9)
- October 2006 (24)
- September 2006 (4)
- August 2006 (6)
- July 2006 (6)
- June 2006 (8)
- May 2006 (18)
- April 2006 (9)
- March 2006 (8)
- February 2006 (10)
- January 2006 (8)
- December 2005 (8)
- November 2005 (12)
- October 2005 (19)
- September 2005 (13)
- August 2005 (15)
Category Archives: Electronics
Pandora Radio – Part 6
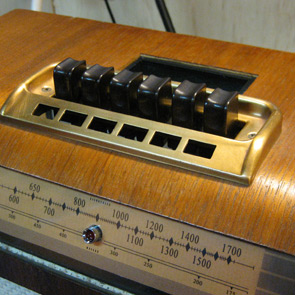
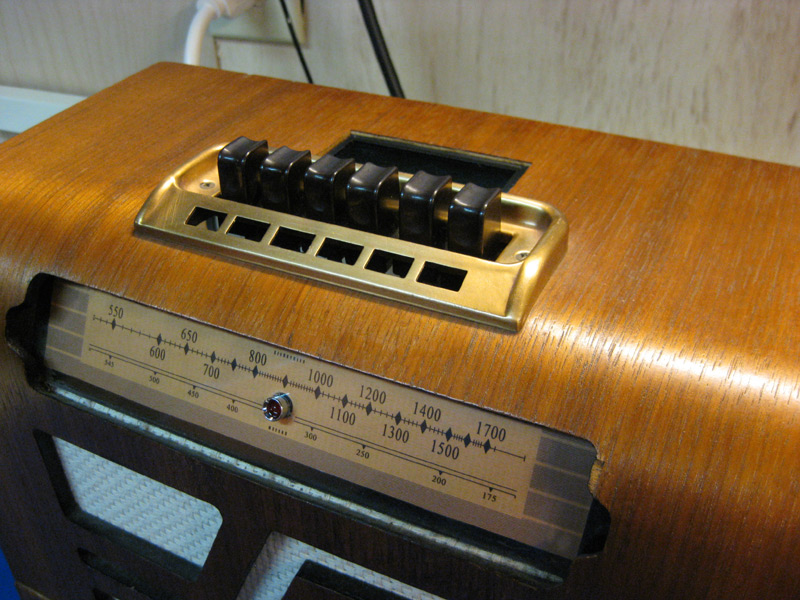
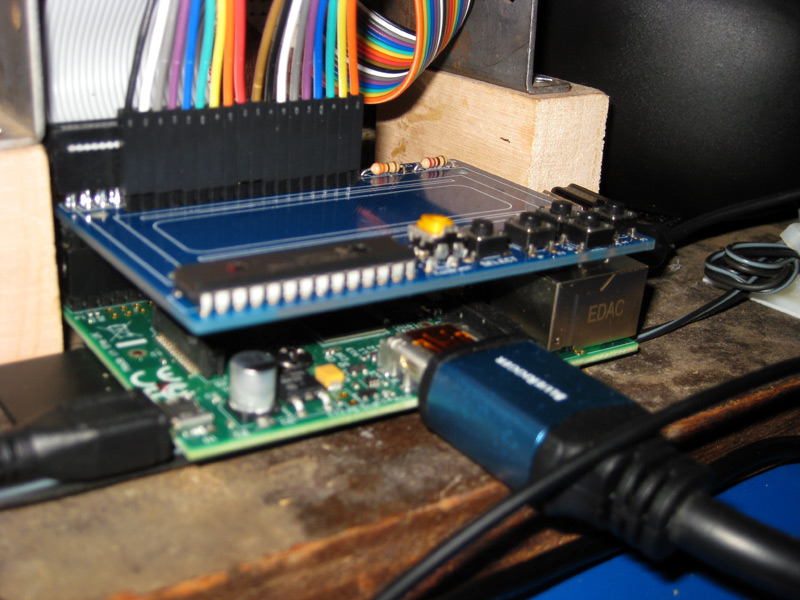
I recently got the radio's original buttons working with the Pandora radio. I built a little board to go below the switch assembly, with some microswitches located under each of the steel legs of the button assemblies, and then wired everything up to a 26 header so that I could connect it up to the Pi. I forgot to take a picture of the top side of the board before I permanently mounted it inside the radio, so you'll have to live with only a bottom-side photo. :)


Posted in Electronics
Comments Off on Pandora Radio – Part 6
Pandora Radio – Part 5
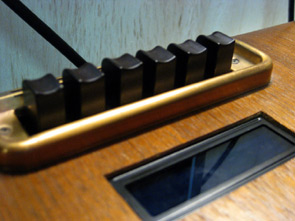
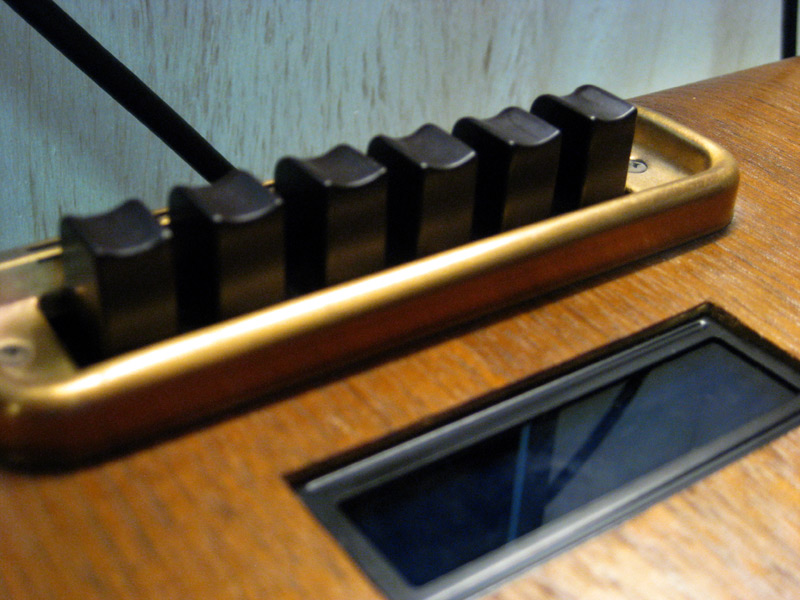
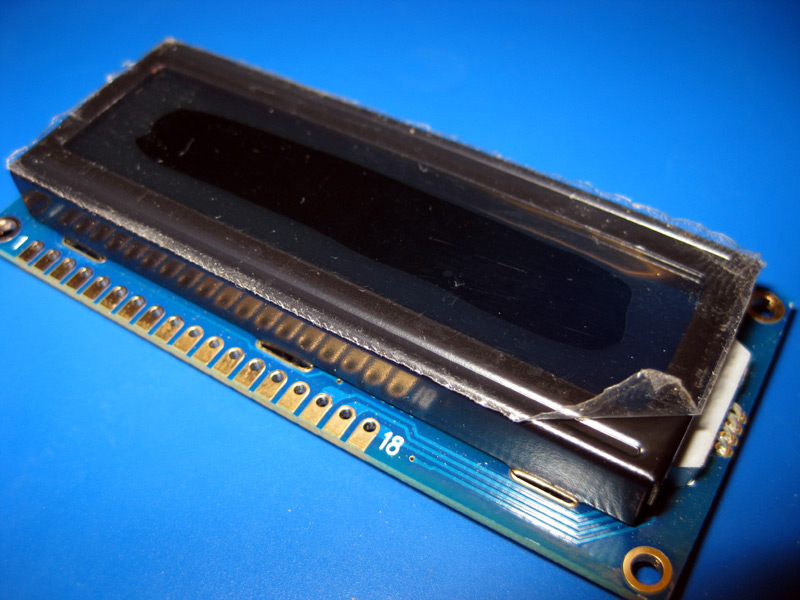
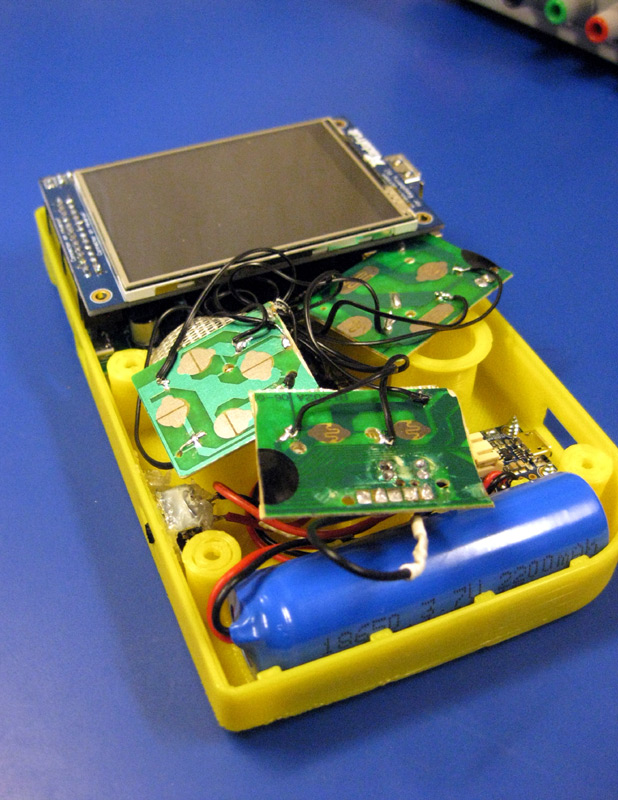
I got the LCD working over the long weekend. It fit the hole perfectly. There wasn't going to be enough room at the top of the case to mount the whole LCD / LCD driver board / Raspberry Pi stack up there without interfering with the operation of the radio's original buttons. So I mounted the driver board and the Pi to the bottom of the case, but ran leads up to the LCD at the top. From a software perspective, I've got the LCD displaying the track name and artist when the song changes, and I will probably setup one of the buttons to allow you to cycle through the backlight colors for the LCD.

Posted in Electronics
Comments Off on Pandora Radio – Part 5
Pandora Radio – Part 4
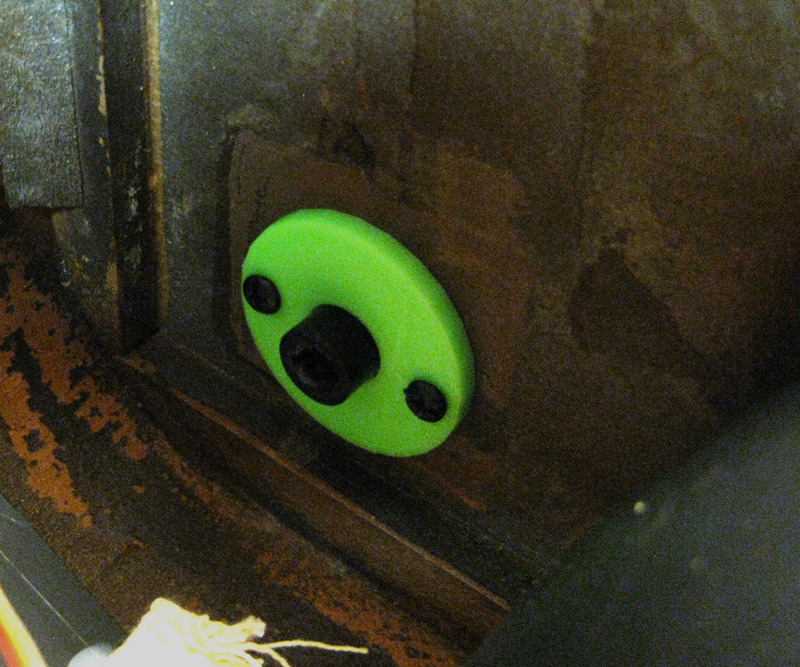
The photo didn't come out so great, but here's an update. The bushings I 3D printed worked out pretty well. It took a few tries to get the tolerances correct, but once I dialed them in they were a perfect fit. I still need to drill some holes in the knob shafts so I can add some sort of retaining pin to keep the knobs captured.
Posted in Electronics
Comments Off on Pandora Radio – Part 4
Pandora Radio – Part 3
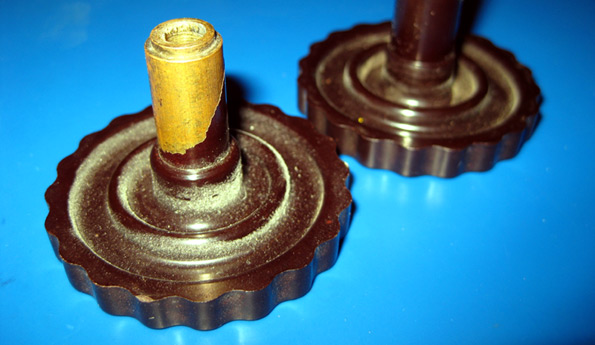
Next up are the knobs. I am planning to reuse one of them as a volume control - I'm not sure if the other will just be for show. The knob shafts don't fit tightly in the holes in the case, so I am going to 3D print some bushings for them. Below is a video of the 3D printer in action!

Posted in Electronics
Comments Off on Pandora Radio – Part 3
Pandora Radio – Part 2
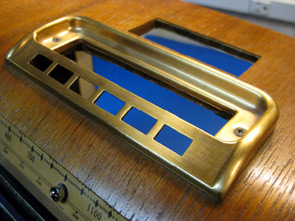
One of my first steps was to cut an opening behind the button area for a 2-line LCD from Adafruit that I'll use to display the artist and song title. I started by scoring the veneer with an exacto knife, then drilled some holes carefully and used a jig saw to cut out the rectangle. I filed the wood back to the scored line until the opening was exactly the right size for the LCD. The control board for the LCD will be mounted as a daughterboard on the Raspberry Pi I will used to run the whole thing.


Posted in Electronics
Comments Off on Pandora Radio – Part 2
Pandora Radio – Part 1
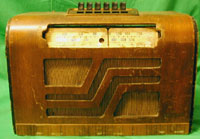
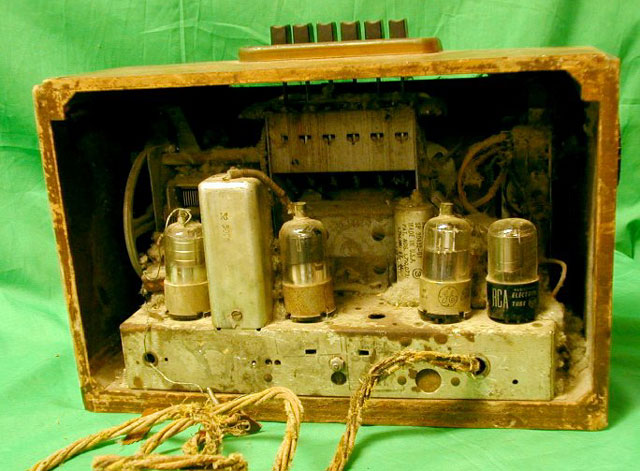
Years ago I bought an old Philco 39-17T tabletop radio with the intent of converting it to a slave set of speakers for attaching an external mp3 player. That project lingered a long time, and I never quite got around to it. Here are some pics of the original radio when I bought it. The outside was a little beat up, but repairable - but the inside was trashed.

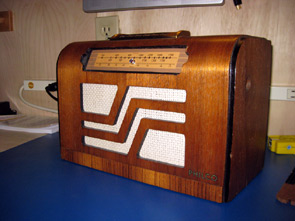
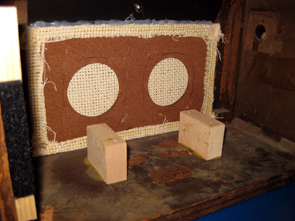
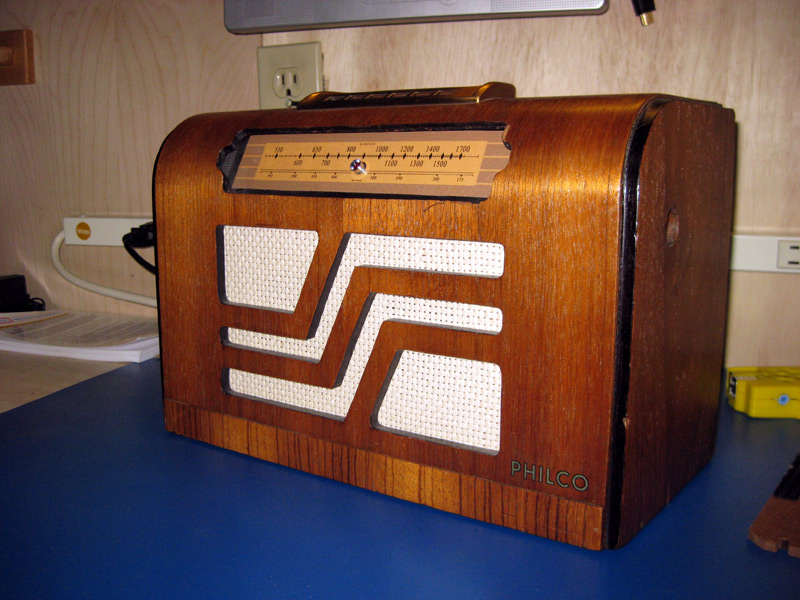
And here are some photos or the restored shell of the radio. I refinished the case, replaced the grill cloth, and spray-painted the metal escutcheon plate. I've gutted the inside in preparation for the new innards.


Posted in Electronics
Comments Off on Pandora Radio – Part 1
Emulation Station

I've been working on another Raspberry Pi project while I try to decide how I want to proceed with the Gameboy. This little box is just about done. The box is made of a single, solid piece of bubinga, and houses a Raspberry Pi running RetroPie/EmulationStation. It runs all of the old console emulators - NES, SNES, Gameboy Advance, Gameboy Color, Sega Genesis - you name it. If it was out during the 80s or 90s, it probably supports it. I've got it setup with two USB-based SNES reproduction controllers, with extension cables long enough to reach the couch. As soon as I finish putting the rest of the ROMs on it, it is ready to move upstairs to the living room. I'll try to grab some "action shots" once I've moved it to its final home.
too.
Posted in Electronics
Comments Off on Emulation Station
Raspberry Pi Gameboy
I've been working on a project with the Raspberry Pi to make a Nintendo Gameboy style handheld that can play all of the original NES games. It's based on this project over at adafruit. So far it has been going really well, but I've hit a snag with getting the controls to line up correctly with the cutouts in the top cover, and getting everything to fit correctly inside - it seems like I've always got at least one button that doesn't line up right and I've got to open it up all over again. I need to do a little more fussing with it before it will be finished. Stay tuned!
too.
Posted in Electronics
Comments Off on Raspberry Pi Gameboy
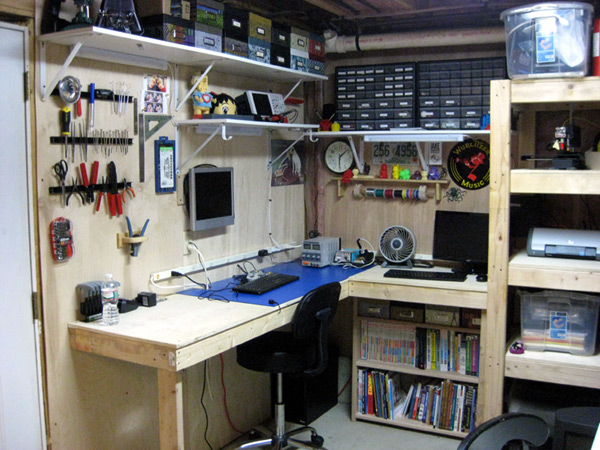
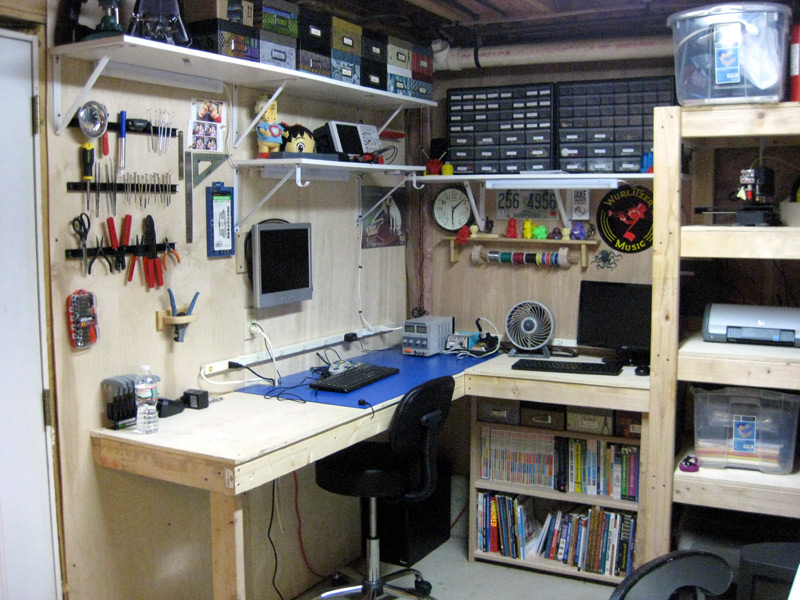
Tinkering Workbench – Evolution
My electronics workbench has been getting a lot of use lately, and I've been steadily adding to it since I first posted about it in May. This first photo is of the original setup, as a point of comparison.
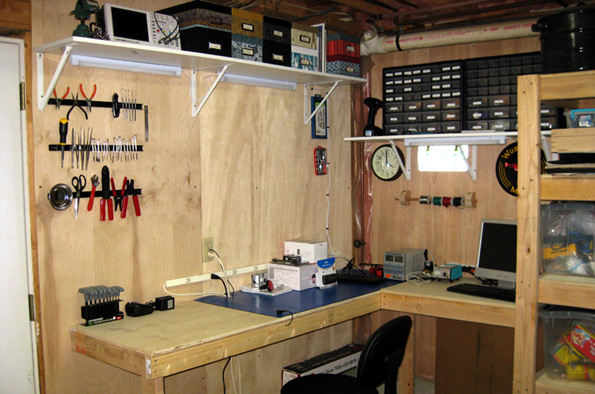
Since then, I've added a lot. More tools, more shelves, more monitors, a bookcase - and I've started taking over the nearby basement shelves as well, to make space for an inkjet printer and my latest acquisition - a 3d printer. That thing has been a blast! I'll be posting a lot more photos of stuff I've been printing in the near future.

Posted in Electronics
Comments Off on Tinkering Workbench – Evolution
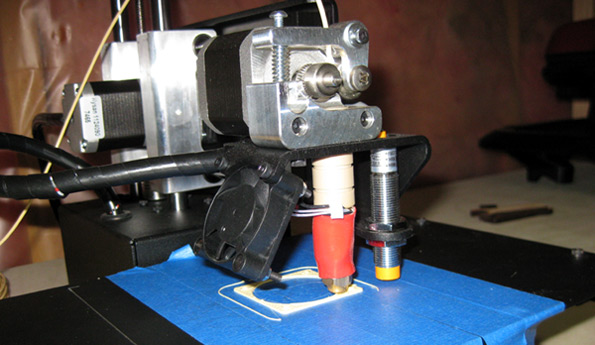
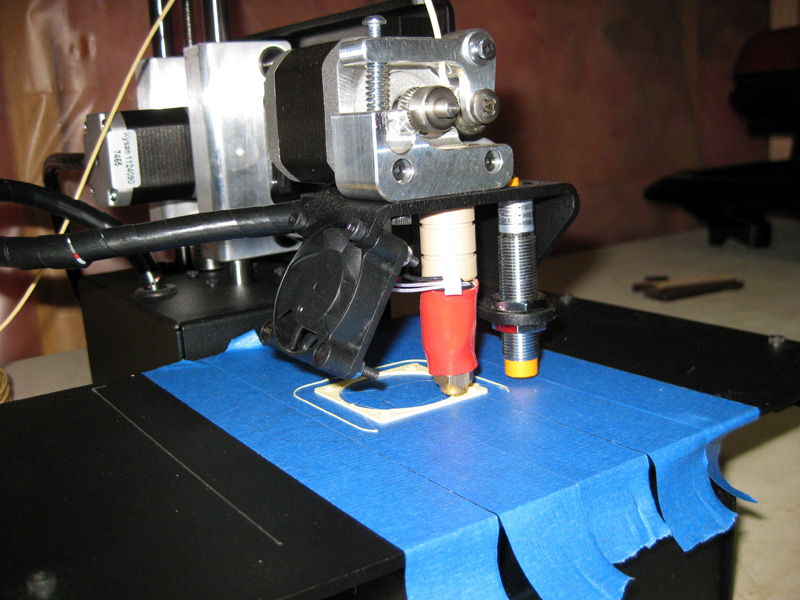
3D Printer
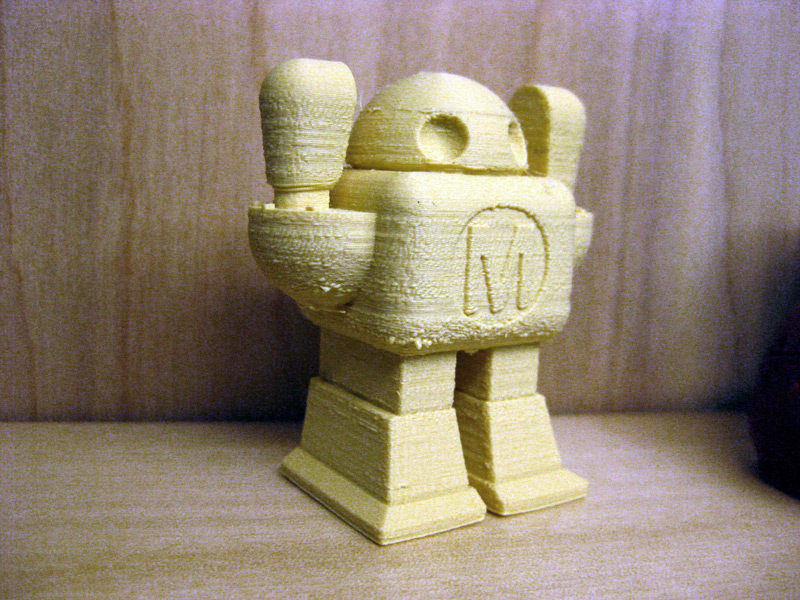
I've been a subscriber to Make Magazine since the first issue, and I've watched the developing world of DIY with excitement. I've wanted a 3D printer for a good long time, and Sean has also been saying that we should get one for at least the last year or so. Well, the entry-level price point has finally dropped into the realm of possibility - last week we pulled the trigger on a Printrbot Simple. I've always wanted to use one for printing small sculptures or designing action figures, not to mention building some robots and printing custom parts. We played with it a ton this weekend, and printed a bunch of small things from Thingiverse. Next up is designing some of our own stuff to print, and coming up with a bigger project. Now we just need to order some more filament! We've already used up the sample filament the printer came with.

Posted in Electronics
Comments Off on 3D Printer